2016年12月29日星期四

How to Create an Audit Flowchart

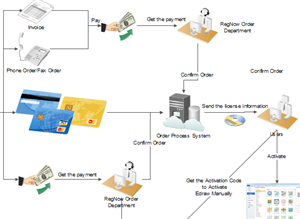
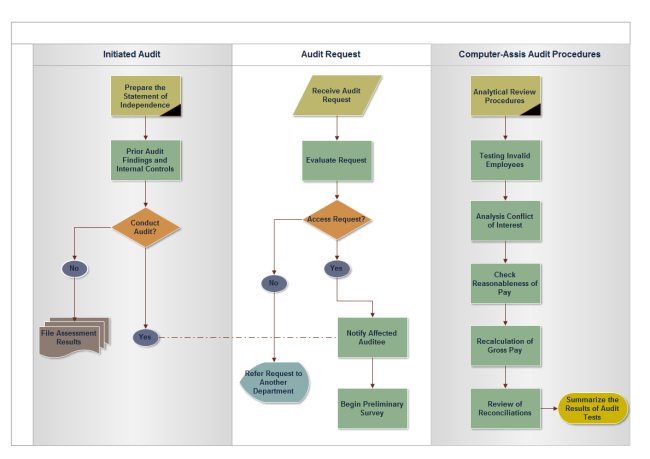
Financial audit, as an objective evaluation of an organization's financial reports and financial reporting processes, is usually carried out by experts who are working on the financial statements. Owing to its crystal clear structure, it is also widely-used for representing an audit process.
Flowchart, a type of diagram that represents an algorithm, workflow or process, showing the steps as boxes of various kinds, and their order by connecting them with arrows. Therefore, flowcharts are often used in auditors’ activity.
Following tutorial will show you how to create an audit flowchart effortlessly and efficiently.

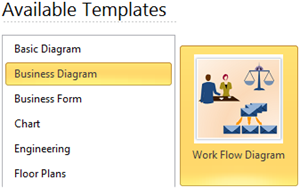
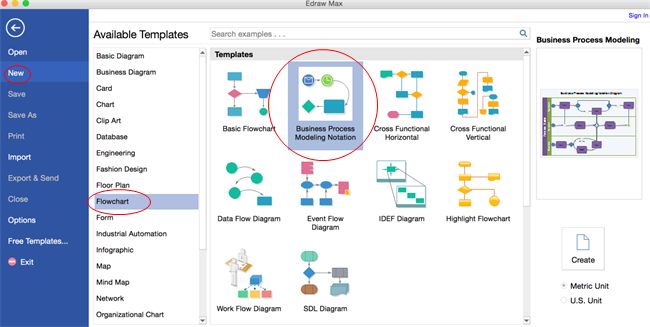
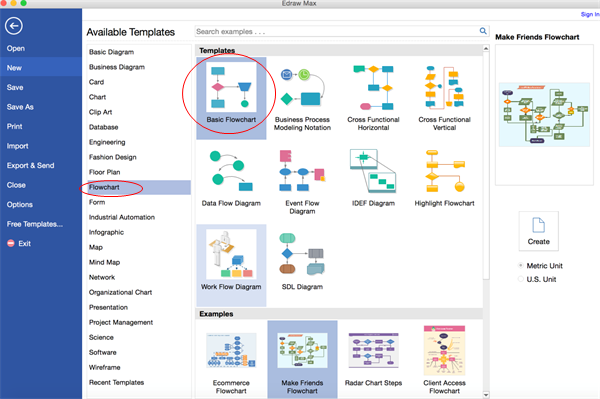
Step One: open a flowchart template

Launch the flowchart maker, on the File menu, go to New >Flowchart, and then double click Basic Flowchart to pen a blank drawing page for creating an audit flowchart.
Open Flowchart Drawing Page

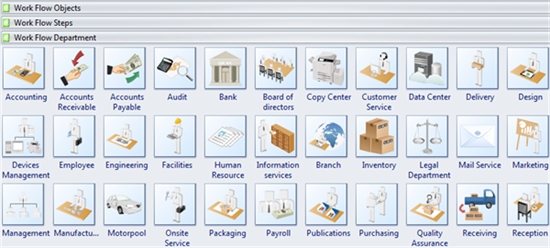
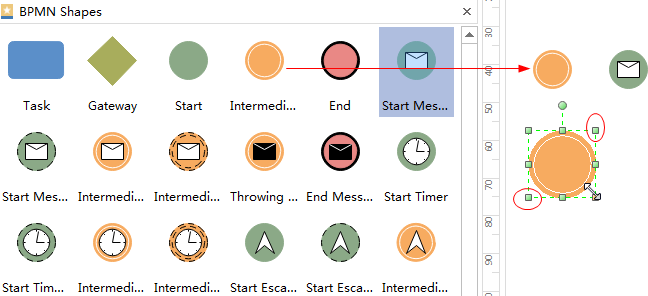
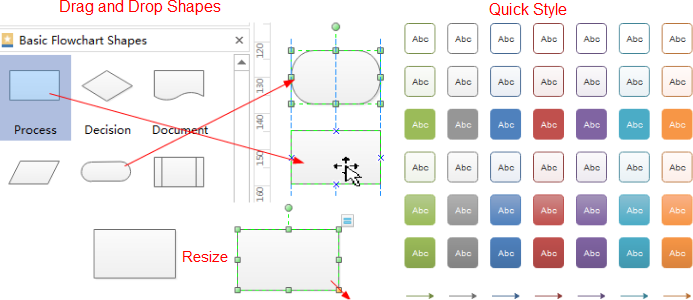
Step Two: add flowchart shapes to the diagram from library

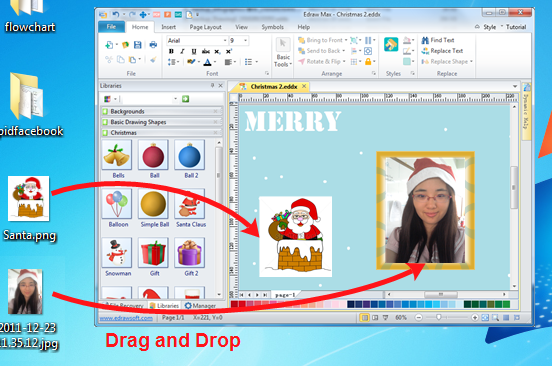
Library on the left panel of the program covers all flowchart shapes needed to draw an audit process flowchart, simply drag and drop them onto your drawing page.
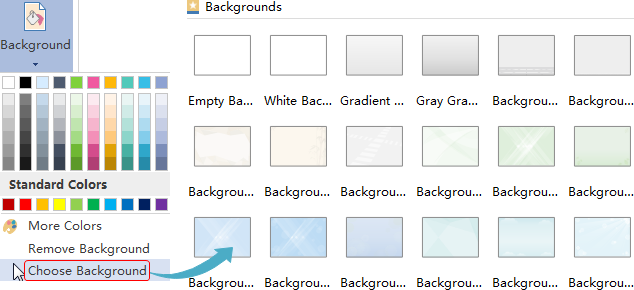
Tips: you can change a shape's color and border by clicking any style under the Home tab in the Styles group.
add audit flowchart shapes to the diagram

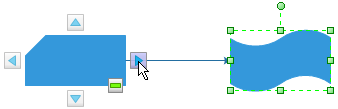
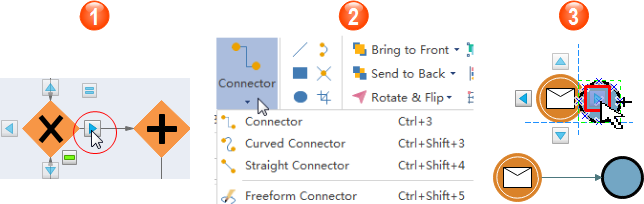
Step Three: connect flowchart shapes

Shapes are connected automatically by clicking the floating action button to generate connectors between two shapes.
Tips: if two shapes are aligned, a straight connector is generated. If not, a right-angle connector will appear. -> Right click a connector to change its style.
Connect audit diagram Shapes Automatically
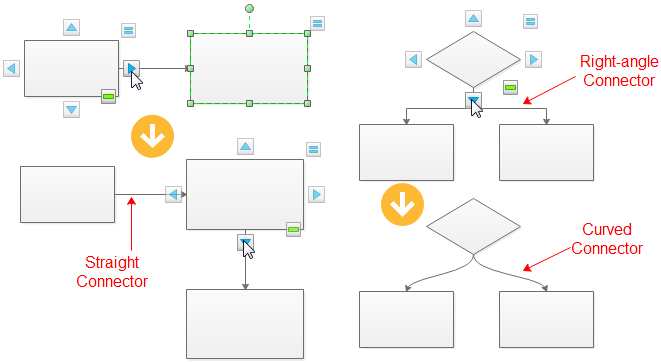
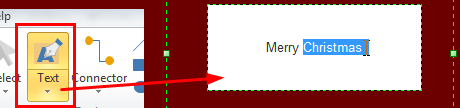
You can also use Connector tool under Home tab to connect shapes manually.

Step Four: add flowchart contents

To add text content to a shape or connector, double click it, and then type. Click on any blank area of the page to finish typing. After that, you have completed an audit flowchart. 
complete an Audit Flowchart

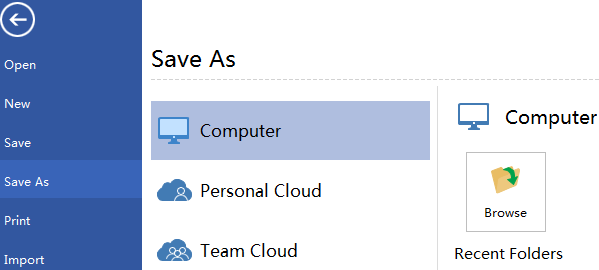
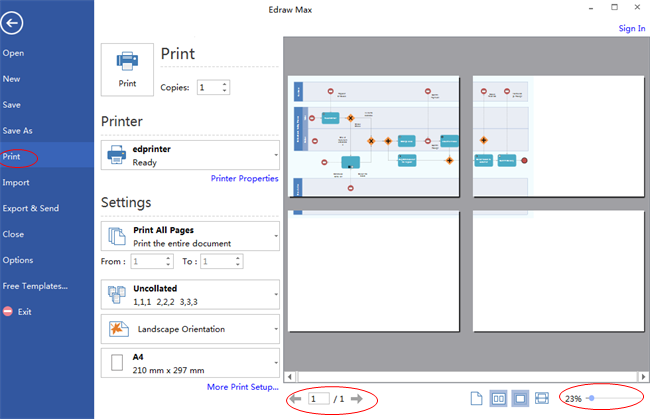
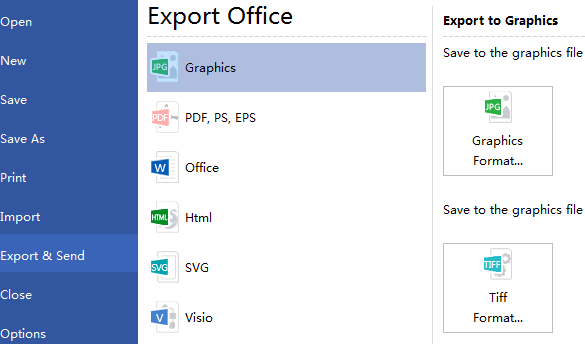
Step Five: save or export completed audit flowchart

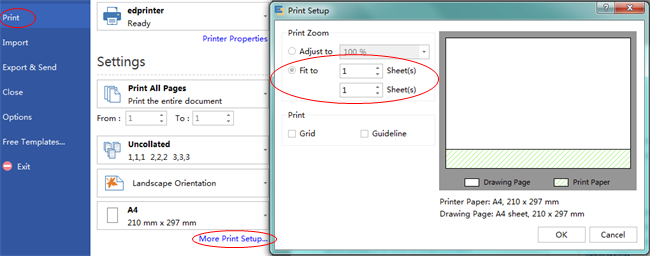
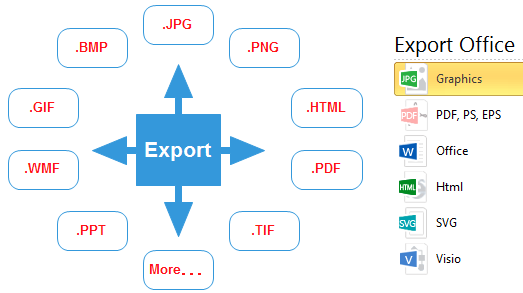
Click Save on File tab to save as the default .eddx format, or you can also select Export & Send under File to export the audit flow chart to images, PPT, PDF, Word format .etc.
Export Audit Flowchart
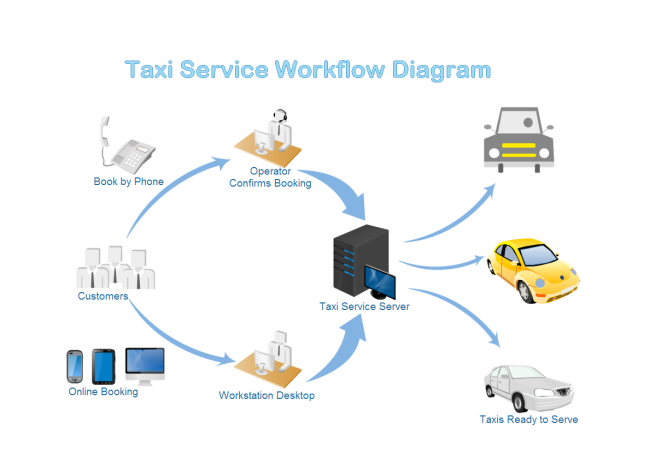
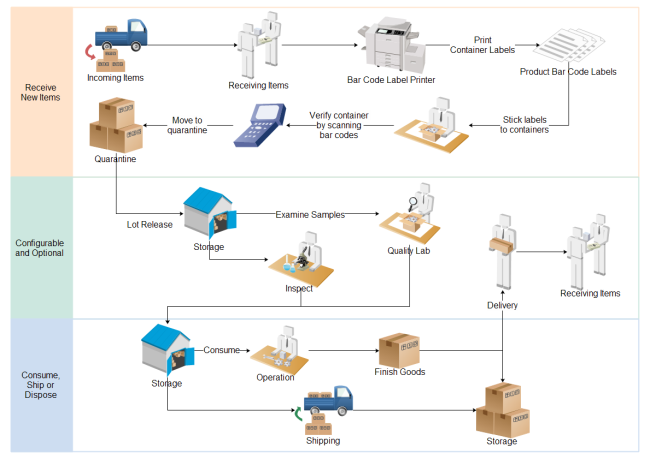
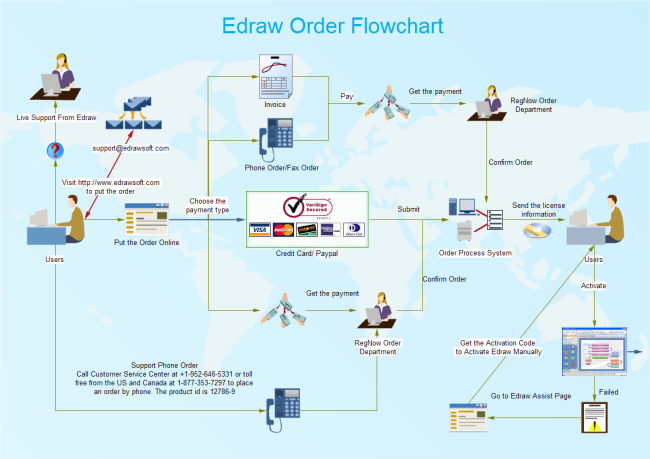
Click flowchart examples to view and download more examples.
For more detailed information, please refer to How to Create a Fantastic Flowchart.

2016年12月25日星期日

Simple Steps to Create Workflow Diagrams

We know that workflow diagrams are commonly used in businesses and organizations. And now we will provide a simple guide on how to create workflow diagram with a professional diagram application.
Workflow Diagram Overview
A Workflow Diagram is a visual step-by-step guideline for completing a task or process. A successfully-built workflow chart not only depicts the flow of tasks and the steps to complete a job, but also identifies the critical steps and locates problem areas. It works as an invaluable analytical tool to help increase efficiency and avoid bottlenecks.
It enables every member involved in the work to understand the work sequence and what department will be handling what duties. It allows them to better understand not only their job responsibilities, but also other members’ roles, which increases accountability.

How to Create a Workflow Diagram

Start with the Exact Template

Start the software, the Workflow Diagram Template helps you easily create workflow diagrams using extensive built-in symbols. Find Workflow template from Business Diagram Category on the starting page and double click to enter the drawing page. You will discover abundant symbols and easy-to-use tools available for workflow diagrams.

Use Standard Built-in Symbols

Apart from basic flowchart shapes, this software also offers a large amount of high-quality built-in workflow symbols, which are categorized in three groups in the library as workflow objects, workflow steps and workflow departments. Besides, numerous illustrations are also available in use. All the symbols are in vector format and allowed for modification. Simply drag and drop any symbol you would like to use from the library pane. If you want to learn more on this part, please visit Workflow Diagram Shapes page for more information.

Basic Steps:

1. Start a blank workflow diagram drawing page:
On the File menu, point to New, point to Business Diagram under Available Templates, and double click the Workflow Diagram template. A new drawing page will open.
2. Add shapes:
Go to the library pane on the left of the canvas. Drag the shapes you need onto the canvas.
3. Edit text:
Double click a shape to edit text.
4. Resize a shape:
Click on the shape once to select the shape, and drag the green control handles to resize the shape.
5. Use floating arrows to connect an adjacent shape:
Hover your mouse over each shape and click one of the arrows that appears along its border to link it to an adjacent shape with a connector.
6. Change connector style: 
Right click on a connector and choose Convert to Right-Angle (Curved/Straight) Connector to directly change the connector style. To change the line color, weight, arrow style and etc., please go to Home tab, Line button for more options. Read Line and Line Ends to learn more about line setting. Please refer to Fine Tune Workflow Diagrams for detailed guide about final touches.
7. Print: When a workflow diagram is done, it’s easy to print and share with more people. On the file menu, point to Print to set for print options. You can change settings with fewer clicks and see the print preview in real time. Go to Print Diagrams for detailed information about printing.
8. Export: This software offers support for exporting your diagram to various formats, including Microsoft Office, PDF, and many other graphic formats. On the File menu, point to Export & Send for Export options. Find more instructions on Export diagrams to other Formats.

Workflow Examples

taxi-service-workflow

material-management-workflow
 
order-flowchart

2016年12月21日星期三

How to Create BPMN Diagram on Mac

This tutorial shows you how to create BPMN diagram on Mac step by step. We offer a time and energy-saving solution through which you can gain professional and nice BPMN diagrams even without any experience.


Create a Blank BPMN Drawing Page

Open a blank canvas and the libraries including shapes needed for creating BPMN Diagrams.
On the File menu, point to New.-> Click Flowchart, and then double click the icon of Business Process Modeling Notification.
Tutorial for Creating BPMN Diagram on Mac - Image 1

Add BPMN Diagram Shapes

Drag and drop shapes from BPMN Shapes library to the canvas. Drag the green square handles to resize shapes.
Tutorial for Creating BPMN Diagram on Mac - Image 2
You can use Same Size tool under Home tab to let several shapes have the same size quickly.
Tutorial for Creating BPMN Diagram on Mac - Image 3

Format BPMN Diagram Shapes

Change a shape's color and outline by choosing any quick style in the Styles group under the Home tab.
Tutorial for Creating BPMN Diagram on Mac - Image 4
Right-click shapes to set the attributes of each object. Every BPMN shape has some underlying data, or attributes. These attributes specify the appearance of the shape, as well as additional data associated with the shape. Right-click the shape and click Define Shape Data to view and change the main attributes in the shortcut menu.

Connect BPMN Diagram Shapes

There are 3 ways to connect BPMN shapes.
  • The built-in BPMN Diagram shapes are designed with 4 connection points and 4 floating action buttons that allow auto connection. Click the floating action button pointing to a nearby shape will generate a connector which links these two shapes.
  • You can also use the Connector tool under Home tab to connect shapes manually.
  • One more way is to drag a shape over the floating point of its previous shape. When a red box shows around the floating button, release the mouse.
The BPMN specification calls for three types of connectors: Sequence Flow, Message Flow, and Association. Connectors you add by using AutoConnect or the Connector tool are Sequence Flow connectors by default. You can change the type by right-clicking the connector and then clicking the type you want in the shortcut menu.
Tutorial for Creating BPMN Diagram on Mac - Image 5

Add Background

To add a background, go to Page Layout tab and then:
  • Click a color for colorful background.
  • Click Choose Background to select a predefined background.
  • Click Remove Background if you don't like the added background.
  • Switch to View tab and then click Background View to edit and personalize the background.
Tutorial for Creating BPMN Diagram on Mac - Image 6

Add BPMN Diagram Contents

  • Double click a shape to type in text.
  • Press Ctrl + 2 to add more text boxes. Press Ctrl + shift + 2 to adjust text box.
  • Choose a different font under Home tab. Customize the size, color and alignment by clicking the relevant menus.
  • Drag the yellow control point to move text box quickly.
Tutorial for Creating BPMN Diagram on Mac - Image 7

Change BPMN Diagram Theme

By changing BPMN Diagram theme, you can enhance fill, line and text style altogether at 1 click.
Switch to Page Layout tab, select another theme.
Tutorial for Creating BPMN Diagram on Mac - Image 8

Save or Export BPMN Diagram

Click Save on File tab to save as the default format. Choose Save as on File tab to save as other formats.
You can choose to save in local files or save in your Cloud. Saving it in Team Cloud can share it with more people.
Tutorial for Creating BPMN Diagram on Mac - Image 9
Hit Export & Send under File to export the BPMN Diagram as graphics, MS files and web documents and so forth.
Tutorial for Creating BPMN Diagram on Mac - Image 10

Print BPMN Diagram

  • Click File tab and then choose Print. A preview of your document automatically shows.
  • To view each page, click the arrows below the preview.
  • TIP: Use the zoom slider below the preview to magnify the image of the document.
  • To go back to your document and modify it before printing it, click the top left arrow.
Tutorial for Creating BPMN Diagram on Mac - Image 11
If the drawing page is larger than the print paper, the drawing will be printed on more than 1 paper. To print it on only 1 paper,
click More Print Setup... and then choose Fit to.
Tutorial for Creating BPMN Diagram on Mac - Image 12
Here are some BPMN diagram examples. They can help you get inspired and get started quickly to create BPMN diagrams.

2016年12月18日星期日

Steps to Create a Rack Diagram

Want to make a rack diagram that you can print and share? Here shares some guidelines for creating professional rack diagrams. Creating rack diagrams with pre-made symbols and templates is rather easy.

What's a Rack Diagram?


Rack Diagram Example
Rack Diagram helps build a graphic framework of components housed in a computer rack, in order to organize the components virtually and document the computer equipment configuration. The components may include servers, switch equipment, Router, Raid, UPS, hard disk drives, modems and other electronic equipment. Learn ultimate rack diagram tutorial to get more details.

Create a Rack Diagram

Rack Diagram Template


Start with the Exact Rack Diagram Template

The Rack Diagram Template helps you easily create rack diagrams using extensive built-in network symbols. I will illustrate the steps based on the software i usually use. Open the software, find Rack Diagram template from Network Category on the starting page and double click to enter the drawing page. You will discover abundant symbols and easy-to-use tools available for rack diagrams.

Use Standard Built-in Rack Symbols

This software offers a great number of high-quality network symbols for rack diagrams, including serial devices, router, ups, bridge, monitor, rack, raid, tape drive, switches, and lots of new devices for use in diagramming rack framework. All the symbols are in vector format and are smart in setting u numbers. Simply drag and drop the one you need from the library pane and set the u number. If you want to learn more about the symbol meaning and usage, please visit Rack Diagram Symbols page for more information.
Rack Diagram Symbols

Basic Steps:

1. On the File menu, point to New, point to Network, and double click the Rack Diagram template. A new drawing page will open.
2. Go to the library pane on the left of the canvas. From Rack Equipment group, drag a rack shape onto the canvas.
3. Choose a required equipment shape and drop onto the rack shape.
  1. Note: Equipment shapes can be glued to the rack to better fit the size. When you position an equipment shape onto the rack, connection points ( blue x ) will appear on the rack shape. When the two ends of equipment shape turn red, it means they are already glued.
PFD Connection
4. Double click the left part of the equipment shape to edit u number, while double click the right part of the equipment shape to edit description.
5. To store data with a shape, right click the shape and choose Define Shape Data from the context menu. In the pop-up dialogue box, input values for the data you want to store.
Store Data
6. To export data report, click Shape Data button under View tab, a shape data floating window will show on the right of the canvas. Click the Export button on the top of the floating window and you will see a dialogue box for data report.
Export Data
Print: When a rack diagram is done, it's easy to print and share with more people. On the file menu, point to Print to set for print options. You can change settings with fewer clicks and see the print preview in real time. Go to Print Diagrams for detailed information about printing.
Export: This software offers support for exporting your diagram to various formats, including Microsoft Office, PDF, and many other graphic formats. On the File menu, point to Export & Send for Export options. Find more instructions on Export Files to other Formats.

2016年12月15日星期四

Top 10 Tips for Being a Successful Fashion Designer

As a common girl, i always have a dream to be a fashion designer. I searched a lot about what should i do to make it come true and i got tips below from a professional fashion designer. Hope these tips can also do a favor for you.

Here is some advice from the famous designer.
1. Get some work experience in the fashion industry.
2. Think about what types of designers are in demand.
3. Find a partner who shares you interest in style and never hesitate to ask partners for help when needed.
4. Let the world know that you're a cut above the rest.
5. Learn from the mistakes every time when you make a career mistake.
6. Become the Queen of a scene and be confident in every scene.
7. Get the fashion thumbs up from one of the greatest living designers.
8. Launch a collection and become your own best ambassador since you know your own collection the best.
9. Promote and expand your brand - the thigh's the limit!
10. Choose the professional fashion design software can help you save a lot time, labor and money.

2016年12月12日星期一

Make A Personalized Christmas Card in 3 Steps

Make a Christmas E-card with your favorite photo and personalized messages for this coming holiday season. In just 3 steps you can finish a good-looking Christmas card. Try it now.

Step 1: Add Background

Applying a background already makes half of the success. You can use a ready-made background from the existing templates on the website/software or download the background package directly by clicking on the link below.
Under View tab of the drawing page, switch to the Background View and copy/paste a background to your page. Below are some sample backgrounds.
Christmas Card Background
Click Here to Go to Christmas Card Background Download Page
You can also draw a background all by yourself using our drawing tools. Click here to see how to create a Christmas card.

Step 2: Add Clip Arts, Local Images and Photos

1. Add Pre-made Christmas Clip Arts:

The software i choose has included a set of Christmas-themed clip arts allowing you to drag and drop to use. The clip arts can be re-edited due to the vector nature.
Christmas Clip Arts

2. Draw New Clip Arts on Your Own

The file i choose does not require any drawing skills because it has many existed resources to use. However, if you are good at drawing,  you can also draw new and personalized clip arts.
Christmas Clip Arts

3. Add Local Images and Photos

Creating a heartwarming Christmas card with personal message and your own photos for your loved ones is an exciting thing to do. Choose the software which allows you to drag and drop local images and photos to the drawing canvas. You can insert one or more photos/images into the Christmas card and lay out them to the best look.
Add Local Image

Step 3: Add Text

Insert a Text Box anywhere on the drawing page and type whatever you want to say. The software has included a large variety of fashion fonts for you to choose. You can also insert vector texts, so that the text could be filled with gradient colors and apply line colors like vector graphics. To insert vector texts, go to Insert menu and click "Vector Text". For Example:
Christmas Card Font
Christmas Card Text Tool
Note: After everything finished, it's important to export your card to a format that everyone could open and read. Choose the software which supports many file formats import & export will help you a lot. Choose an appropriate format, and with one click, a new Christmas E-card is ready to send out.
Christmas Card Export

View Christmas Card Examples

Below are some Christmas card examples created with pre-made clip arts and background. With lots of materials in the program, you don't have to be professional in design, but could get professional results. Don't you think it can be a great practice and game for children? Let them release their creativity and make a personalized Christmas card this Christmas which is more meaningful and worth keeping.
Christmas Card with Bible QuoteChristmas Card Bible ScriptureChristmas Card with Photo Frame

2016年12月8日星期四

Top 10 Interesting Mind Map Examples for Students

Mind map examples for students are capable of giving them the freedom to roam the infinite expanses of their brains and unlock the potential.
Following are some interesting mind map examples for students and hope these examples can help them understand mind maps better and exploit their potential of the brain.
Barbecue Mind Map
Through this clear and simple mind map, we know that this barbecue aimed at making friends and enjoying life, held on May 15th, 2014 at Songla Beach and also some other obvious information.
Barbecue Mind Map

Better Sleep Mind Map

Not only for students, but also for adults, good sleep is the premise of an energetic day. This mind maps gives us some useful tips to have a better sleep.
Better Sleep Mind Map
Birthday Mind Map
For most of kids, birthday is one of the most important days in their lives. Making a birthday mind map enables them know the whole party procedure easily.
Birthday Mind Map
Camp Awards Criteria Mind Map
Getting awards is one of the happiest moment for all students. With this clear camp awards criteria mind map, they can know how many awards there are and how to get them.
Camp Awards Criteria Mind Map
Healthy Lifestyle Mind Map
If you are stilling wondering how to have a healthy lifestyle, view or download this healthy lifestyle mind map and you will find the answer.
Healthy Lifestyle Mind Map
Benefits of Fruits Mind Map
Some students are picky eaters. Maybe when they see the benefits of fruits mind map, they will change their attitudes to those fruits that they do not like before.
Benefits of Fruits Mind Map

Sunday Activities Mind Map

Weekends are the most expectant days among a week. And students usually have many activities on weekends, just like the activities in the mind map.
Sunday Activities Mind Map
English Camp Activities Mind Map
Attending different camps to arouse interest and expand horizon is a common thing for students. Following mind map depicts the activities of one day in the English camp.
English Camp Activities Mind Map
Be a Good Teacher Mind Map
In students minds, a good teach should provide positive feedback, seeks continually to improve teaching skills, fosters critical thinking, encourages an open and trusting learning environment and so on, just like below mind map.
Be a Good Teacher Mind Map

Course Plan Mind Map

If you are entering into a new grade, take a look at following mind map and you will know your course plan in the new grade.
Course Plan Mind Map
More Mind Maps
If you like these examples and want to see more, click mind map examples and mind map templates to view and download more examples and templates if any interest.

Problem Solving Mind Map
Meeting Mind Map